Jeep First Year

Sunday, May 16, 2010

Shackle Fabrication

I finally fabricated the shackles, here is a sneak preview at my fabrication process. The shackles were made from 2"x3/8" mild steel. Most shackles are made from 1/4" heat-treated steel, let's hope these will be strong enough.

In an effort to line up the holes properly, the plates were stacked on top of each other and marked with a letter to preserve orientation.

I made sure I used a non-symmetric letter and put it on a side to keep the orientation of the plate unique.

The stack was then clamped together in a vice and squared up. The stack was welded together to keep it together during the drilling process.

Pilot holes were drilled to give a 4" center-to-center shackle.

The pilot holes were drilled out to a final 1/2" diameter.

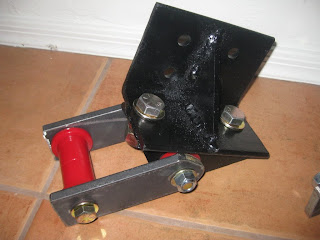
Here is the completed shackle (unpainted) and mount. The shackle bolts are 1/2" gr 8 fine thread with gr 5 steel-cut lock nuts. Note that a curve had to be ground into the top of the shackle to allow it clearance to pivot. I may weld a cross plate/tube between the two shackles, but I want to verify clearance with the spring eye before I do that.

Sunday, May 9, 2010

Update

I finally got the hardtop for the jeep.

View of the mockup for the rear shackle hangers.

Rear out boarded spring hangers competed.

Friday, March 26, 2010

Sandblasted knuckles

I was feeling lazy and didn't want to start up a sandblasting booth or whatever just to handle a few parts, so I sent them to a local jobber to take care of the brake brackets, splash guards, and knuckles. I will be sending the knuckles off to parts mike. I will also be replacing all the ball joints.


BEFORE:


AFTER:


Now I have to hit them up with a gratuitous amount of primer/paint and then send them off.

Outboarded Spring Hangers VI

I finally finished the front spring hanger. It is bolted up with 6x 7/16" bolts in the stock locations in addition to 4x 5/8" bolts on the outboarded section. I have included pictures of how it ties into the stock locations and the outboarded mounts as well. I also finished adding gussets to the angle steel for the outboarded mounts.

I added an american flag sticker to the cross member, because hey, it was made in America.

Passenger side bolt configuration.

Driver's side bolt configuration

Side shot

I still need to drill the spring holes and bolt them up.

Front view of the waggy axle and YJ springs with the outboarded hangers

Driver's side detail of how the outboarded spring hangers tie into the frame

Passenger side


Hangers after welding in the gussets and painting them

Before paint

Passenger side before gussets

Driver's side before gussets

Sunday, March 21, 2010

Flat top knuckles

Here are my "new" flat-top knuckles off of an 80s dodge w150. I will be sandblasting them, removing ball joints, and sending them off to John Nutter for machining. Once I get them back I will paint them and then install new ball joints, studs, arms, cone washers, and nuts.

Caliper, mounting bracket, and splash guard. I can get a pair of calipers for $56 loaded with brake pads, so I will just be picking up new calipers, At least these cover the expensive core charge.

Spindle nuts and caliper mounting bolts.

My warn hubs to top off the whole setup.

Here is the spindle mounted on the knuckle and the hub/rotor assembled on the whole knuckle. I will run these dodge knuckles knuckles out.

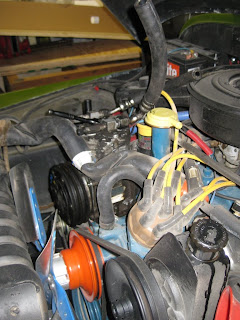
This is my york 210 air compressor placed where I plan on mounting it. I will be building the bracket for this pretty soon. I have figured out where I am going to tie it into the engine. I have also dug up all the parts that I will need to set up my OBA. I will be using Grainger for most of the parts and the local hose shop for plumbing/fittings. I still have to scare up a set of flanges for the compressor instead of the rotolock ones. If I had access to a lathe I could make my o-ring crush surface and then do the rest of the milling/tapping in my shop. Also there are different kinds of York air compressors with three different output specifications. Usually there will be a stamped aluminium plate indicating the SCFM of the air compressor. Mine did not have such a plate, but it had a little sticker on it that seemed to have some information on it. This sticker was covered with grease and I tried rubbing some of the grease off with my nitrile glove, but I just kept smearing it around. Eager to investigate what kind of air compressor I would be working with, I shot the sticker with carb cleaner and to my surprise all the grease was removed, along with the letters I was trying to make out! All is not lost. You can determine what output your compressor is if you remove the pulley and investigate the taper on the end of the shaft. There are plenty of sites that cover this. If you look below on the compressor you can see a shiny, blank sticker as proof of this incident. My plans with this compressor are to spray it with like 10 cans of carb cleaner and then do an oil change on it. I'll probably paint it orange or something crazy.

I will also have to find a different bend of radiator hose. The compressor will be on the fan, alternator compressor belt loop.

Outboarded Spring Hangers V

So I have been waking up early on the weekends to bust out some of this fabrication. I have fallen into the habit of having pre-fabrication coffee.


I was about to sip some coffee, but apparently even the face shield protects me from a caffeine injection. Here is a re-enactment.

Here are some other plates being added to the front spring hanger for the SRS.

I added the extra plate so I could tie this into the stock mounting positions. This plate will slide between the steering mount bracket and the frame.

Here are some of my welds. I won't show you some of the ones that I made after like an hour after 4 cups of coffee and no breakfast :D. I also changed the shade and shade guard in my welding helmet. NIGHT AND DAY! I could now see he puddle instead of the orange haze I was seeing with my arc-welding shade. I am very excited about my new lighter shade!

I Used 3x5 box tubing, 3.5x5 would've been ideal as the interior of the tubing measures 3" + the two 1/4" walls. I am going to run YJ springs which are 2.5" with about 1/2" of bushings. At any rate, I had to chop them and put on some new flanges.

I had to add the flanges, used the box tubing cutoff to square them up.

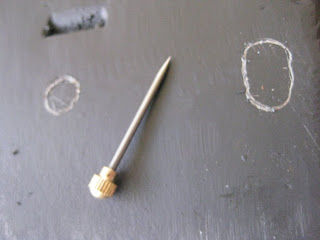
My technique for marking holes once I got the SRS system mounted in place.

I used flat black paint and the scribe to do the above the markings.

Here are some beauty shots. I also am showing it next to the warrior bracket.

I will be mounting this up with 5/8" gr 8 bolts, I still need to add gussets. I will add the gussets tonight and paint the angles. Next, I need to come up with some kind of shiny sticker to add to my SRS sytem so it looks legitimate.

I ordered my tires, wheel adapters, and shackle bushings. I am not going to build the rear members until I get the shackle bushings so I can know what size of DOM (inner dia) and hole saw (outer diam) I will need. I will then build up 4 plates to pull this together. My current concern is that I might have to remove the headers and brake lines to grind off the old SRS brakets...stay tuned.